Cloud storage has become a saviour to store files when your hard drive fails to store the huge amount of data on your system. In addition to this, cloud storage helps you access the data and information stored from any system connected to the internet. Undoubtedly, Dropbox is one of the most popular cloud storage providers that helps you to store data on the cloud and access it from anywhere with just a simple login.
Despite being the popular service, Dropbox users face some bugs and unexpected errors. Dropbox is a freemium cloud storage provider which offers free storage only up to 2 GB; you would have to subscribe to their premium if you need further free storage. Today, there are many better alternatives to Dropbox which offer better storage and better services. Some of them are Google Drive, Microsoft One Drive, Zoho Store, and Sync. So, if you want to add more cloud space you can consider using them instead of Drop box. In such case, you might want to uninstall Dropbox as it would be of no use. Uninstalling Dropbox might get tricky from MAC. This article helps you to uninstall Dropbox completely from your MAC and free up your system.
You can do it in different ways. Here we are discussing the simple and most working methods.
Method 1: Remove Dropbox manually from the system:
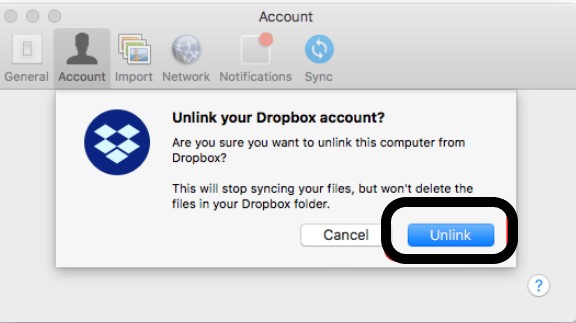
Step 1: Unlink your Dropbox account
Launch Dropbox on your system > Click on the Dropbox icon from the menu bar > Go to the settings > Select ‘Preferences’ > Account Tab > Unlink this Dropbox.
Once it is done, click on quit Dropbox.
When you are unlinking this Dropbox on your Mac, you will be signed out of the Dropbox application on your Mac, but the folders or files that once synced locally on your Mac will be still kept on your Mac. Any later changes made to your files in your Dropbox account cannot sync to your local files.
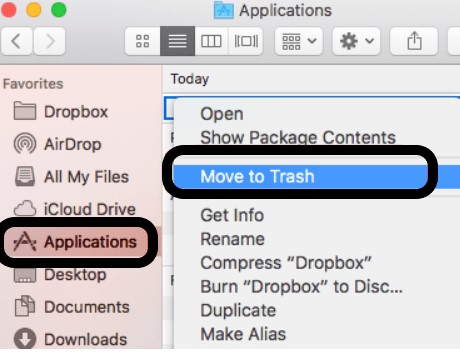
Step 2: Move the Dropbox to trash folder:
Go to Finder>Applications, and find Dropbox. Right click on the Dropbox icon and select Move to Trash.
To remove Dropbox from your MAC permanently, you need to open Trash, find Dropbox, then right click on Delete Immediately.
This manual removal of the Dropbox method sometimes doesn’t work because the system shows that the removal of the application is impossible as the app is bound to the application account. Still even after unbinding the application account and then trying to remove the Dropbox folder with all the files.
Nevertheless, you can uninstall Dropbox by doing one extra step.
After you click on Delete Permanently, Open Finder and then Dropbox, delete all the files and folders. Right click on Dropbox, click on remove from Sidebar.
By now, Dropbox would have been uninstalled from your system.
You can also uninstall Dropbox by using third party apps conveniently.
Method 2: Remove Dropbox using third-party apps:
The other easy alternative method to remove the dropbox from your Mac device is by the usage of tools. There are some popular applications which help you in doing it. “App Cleaner” is one such application which helps you to remove the Dropbox folder from your device. This software also allows you to manage the different extensions. With just one click, the software app cleaner will disable the unwanted Mac start-ups programs. You just need to follow these easy steps:
Step 1: Firstly, you need to close the Dropbox application. Once done, you need to launch the app cleaner and then search out for the Dropbox on it.
Step 2: When you find the application on the app cleaner, click on the app > select the delete option and press ok to delete it.
Using App Cleaner you can perform uninstallation easily compared to conventional processes.
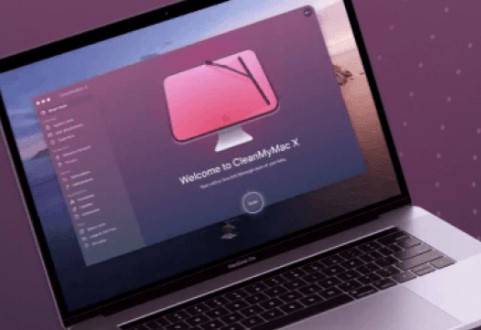
CleanMyMac X is another third-party application which helps you uninstall.
- Download and launch CleanMyMac X and click on the Uninstaller tool in the sidebar.
- Locate Dropbox in the list of apps and check the box next to it.
- Press Uninstall.
Check for any files by clicking on Leftovers in the uninstall utility. If there are any listed, check the box next to them and press Uninstall.
Method 3: Uninstall Dropbox from utilities
Step 1: Go to utilities and go to applications available on the Dropbox folder.
Step 2: Open the activity monitor and scroll to lines which consist of Dropbox.
Step 3: Then, click on X to force quit an application.
Step 4: You have to repeat this method for each line which consists of Dropbox, and then try to uninstall the Dropbox again.
If you can’t delete Dropbox!
Sometimes, you might fail to remove Dropbox completely even after multiple attempts. This happens because of background processes of the Dropbox application which does not shut down properly. You can close these manually by following steps:
Step 1: Click on the ‘Activity Monitor’ inside the utilities folder within your applications.
Step 2: In the Activity Monitor, look for lines that say ‘Dropbox.’ Select the process and click ‘X’ located in the top-left corner to force it to quit.
Select 3: Repeat the same step 2 for each process and then try to uninstall Dropbox again by deleting the app from within the finder.
Delete your Dropbox account permanently
Once you have opted for different cloud storage, managing Dropbox would be unnecessary effort. So, you might consider deleting your Dropbox account permanently.
Step 1: Open a browser app and type Dropbox.com into the address bar.
Step 2: Sign-in to Dropbox using your email id and password.
Step 3: Once there, go to the top-right, click your name and select the ‘Settings’ from the drop-down menu.
Step 4: Down the ‘General’ header, locate and click on ‘Delete My Account.’
That is it! Your Dropbox account will be deleted permanently.
Bottom Line:
Dropbox is one of the most popular cloud-storage providers with more than 700 million registered users, among which 15.48 are paying users. Although Dropbox is a reliable application with many convenient features, you might prefer to be its paying user when you have better alternatives. This article covers most working methods to uninstall Dropbox from your Mac including how to delete your Dropbox account permanently. If you find this article helpful, please do let us know in the comment section.


