The Goods and Service Tax (GST) in India is one of the largest tax reforms the country has ever seen. The GST was implemented to streamline the tax collection and calculation process and minimize tax evasion. For this reason, there are a number of features of the GST that help the government monitor tax collection easily. One of the main features of this new GST regime is the existence of a GST Identification Number (GSTIN). The GSTIN is a unique identification number given to each taxable individual under the GST.
The GSTIN is designed to make monitoring of taxes much easier as all taxable transactions related to an individual who is liable to pay GST are attached to the GSTIN, this provides all the taxable information of an individual in one place. The GSTIN comes with a number of benefits for both the taxpayer as well as the tax collecting authority. The simplicity of the system and the accountability that the GSTIN provides makes this one of the main features of the GST.
What is the Format of GSTIN?
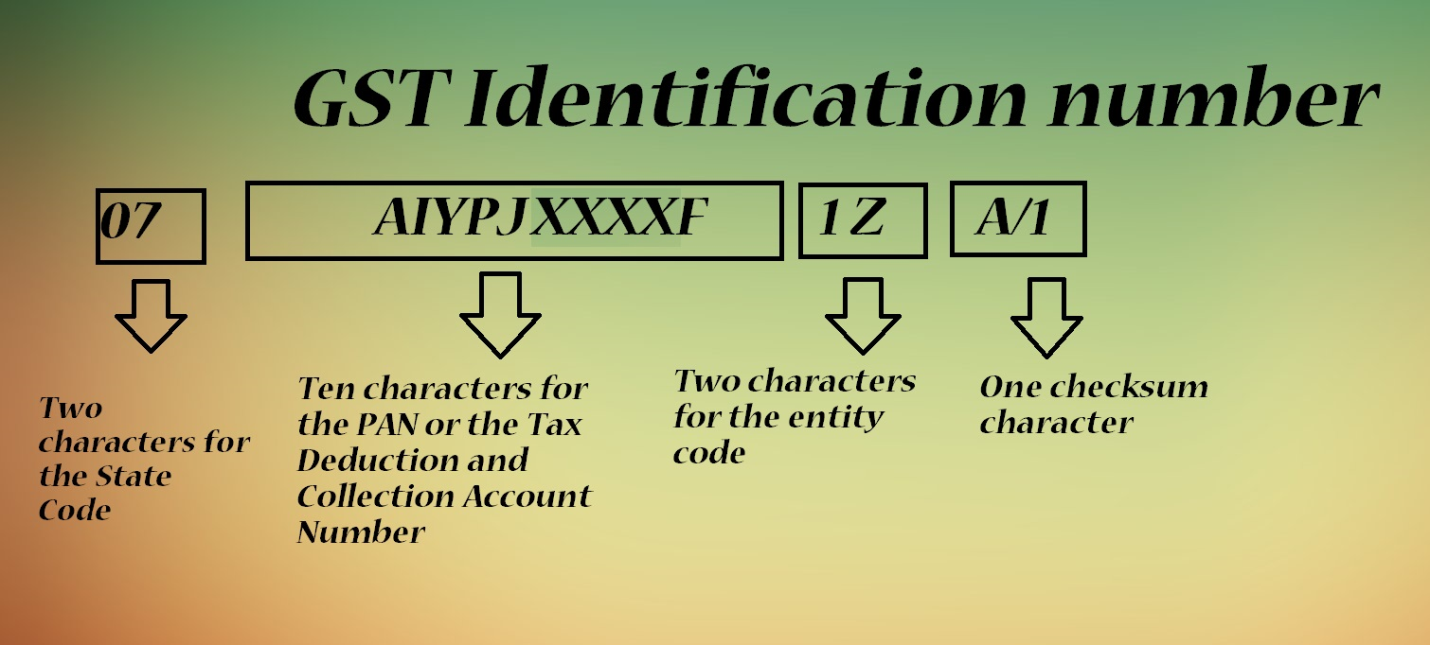
A GSTIN is provided to every individual that has registered for GST. The GSTIN is a 15-digit unique identification number that includes the taxpayer’s PAN number as well. Let’s take a look at the format of the GSTIN.
22 AAAAA1111B 3 Z 7
The first two digits (22) represent the state code of the GST.
The next 10 characters is the taxpayer’s PAN
The next digit (3) represents the entity number of the same PAN within the state
The letter ‘Z’ is included by default
The last character (7) is the checksum character. This character can be a letter or a number.
The checksum character is used to check the validity of the GSTIN. If the GSTIN format is correct but is showing up as an incorrect GSTIN, the checksum can be used to check the validity of the GSTIN. The checksum is derived by applying a mathematical formula to the first 14 characters of the GSTIN.
How to Generate a GSTIN?
The GSTIN is provided to every business that is registered under GST. This 15 character alpha-numeric is attached to every business transaction carried out and is used at the time of calculating an individual’s tax liability. Any individual with an annual turnover above Rs. 20 lakhs needs to register for GST.
PART A of the Application Process
The GST registration process is quite simple and straightforward and can be completed online. Let’s take a look at the steps involved in registering for GST.
- Go to the GST Portal and select the option ‘Services’ located on the top left of the screen.
- Under the tab ‘Services’ select the option ‘Registration’
- Under the tab ‘Registration’ select the option ‘New Registration’
After clicking on the option ‘New Registration’ you will be redirected to a page where you will need to fill out a registration form. The GST registration form consists of the following:
- The first field in this form will determine the type of GST Registration you want to undertake.
- Select ‘Taxpayer’ as the type of registration you want to complete.
- Select the state in which you would like to register the GST for your business
- Select the district from which the business will be operating
- Provide the ‘legal name’ of the business as stated on the PAN
- Provide the PAN of the business
- Provide a valid email ID on which the OTP for the GST Registration can be sent
- Provide a mobile number on which a separate OTP will be provided for verification
- Enter the captcha that appears at the bottom of the page and click ‘Proceed’
The next page is where the Temporary Registration Number (TRN) will be generated
- Enter the OTPs you have received on your mobile number and email ID separately
- Click the ‘Proceed’ button at the bottom of the page
- A TRN will be generated, click ‘Proceed’
The TRN will be used by the system to save your application and track its status.
- On the next page provide the TRN that was generated and the captcha that appears
- Click on ‘Proceed’
- You will receive an OTP on your registered mobile number and email ID
- Enter these OTP and click ‘Proceed’
This process will save your application and you will be able to check the status of your application using the TRN. Until the application is submitted the status of your application will be ‘Drafted’. Once the application is submitted the status will change to ‘Pending for Validation’.
Once the TRN is generated you will have 15 days to complete the GST Application and submit it.
PART B of the Application Process
Part B of the application process is more specific to your business. To begin Part B of the application you will need to sign into the GST Portal using your TRN. Here are the steps you will need to follow in this portion of the application process;
- Login using the TRN generated earlier
- Enter the captcha that appears on the screen
- Verify the OTP. The same OTP will be sent to your registered mobile number and email
Once you have logged in using the TRN navigate to the ‘My Saved Application’ page. The documents required for this phase of the application process are;
- Photographs
- Constitution of taxpayer
- Proof(s) of Place of business
- Bank account details
- Authorization form
This section of the GST application has multiple tabs, you will need to select the relevant one to you.
In the first tab you will need to provide your business details. You will also be able to apply for the Composition Scheme on this page.
The second tab is for Promoters and Partners. Here you will be required to provide the information such as addresses and identities of the promoters and partners. You will also need to upload documents as proof of the same.
The next tab is for the authorized signatory. In case the authorized signatory has been provided in the previous tab this section will be auto-filled.
The Authorized Representative tab is in case you have a different person authorized for GST.
The Principal Place of Business section requires you to provide the address of the headquarters of your business. This section also requires you to upload the legal ownership document. You will also need to provide details of any additional places of business here.
The Goods and Services section requires you to provide details of the Goods and Services being provided by the business. You can add a maximum of 5 goods and 5 services to this section. The HSN/SAC codes of the goods and services will also need to be provided.
The next section requires you to provide Bank Account Details.
The next section will require you to provide some state-specific information.
The last and final step is Verification. Verification can be done in two ways;
Submit a DSC: DSC or a Digital Signature. You can register for a digital signature on the GST Portal. Sign your application using this DSC token.
Verification using EVC or e-signature: The EVC is a type of OTP. This OTP can be used for verification.
After completing all the above steps you will receive an Application Reference Number (ARN). You can use this ARN to track the status of your GST application. It takes 4 – 7 days to receive a GSTIN after submitting a completed GST application.
Once you receive a GSTIN there are a number of ways to perform a GST number verification. You can use the GST Portal to verify your GSTIN or other third party websites.
Author: I’m Jaylin: SEO Expert of Leelija Web Solutions. I am a content manager, and the author of elivestory.com and a full time blogger. Favorite things include my camera, travelling, caring my fitness, food and my fashion. Email id: editor@leelija.com
